


In this article, we will be reviewing what authentication and authorization mean.
Most times it gets confusing to differentiate between authentication and authorization. I hope this article solves this confusion. Stay focused as we dive into this topic with simplicity.
Pre-requisites
An understanding of Django and Django models.
A basic understanding of python environments
A suitable code editor such as Vs code
What is Authentication?
Authentication is the process of verifying a user's identity.
Authentication is to ensure that an intruder does not access a user's account. Common means of authentication is by using passwords. The system verifies that the password belongs to a user and proceeds to grant access.
Other ways of authentication include:
OTP (One Time Password): This process involves the use of a password that can only be valid once. It is often used by most banks to verify online transactions.
Biometrics: This involves the use of fingerprints to identify a user. It is usually used on our smartphones, the internet etc.
We will be focusing on using passwords to explain authentication
What is Authorization?
As the name sounds, " authorization", it means to grant permissions. For instance, when we are not allowed to access a certain page. This means that we are not authorized.
To make it easier, authorization is when we have access to particular functions. For example, the right to remove users as an admin on a Whatsapp group.
To understand better, let's build a simple authentication and authorization system using Django.
Step 1: Create A Django Project
On our cmd, create a directory called "admin", we can call it anything we like. After this, navigate into this directory
Step 1: Create A Django Project
On our cmd, create a directory called "admin", we can call it anything we like. After this, navigate into the created directory
mkdir admin

cd admin
Step 2: Create a virtual environment
We will set up the virtual environment using virtualenv. If we do not have virtualenv installed, we can do so using the code below
pip install virtualenv
After the installation of virtualenv, the next step is to start our virtual environment. Django and any other requirements are to be installed inside this virtual env.
virtualenv env
The code above will create a virtual environment called "env". we should have a screen like to the picture below

Now, let's start our virtualenv by running env\scripts\activate
env\scripts\activate
After the virtual env is activated, our screen should look like the snippet below
(env) C:\Users\user\Desktop\admin>
The way to know if our env is working is the (env) coming before the directory path as seen above.
Step 3: Install and setup Django
Installing Django is very easy. we have to run only a command for it to get installed.
pip install Django
After installing Django into our virtual env, the next thing to do is to start our Django project.
django-admin startproject admin
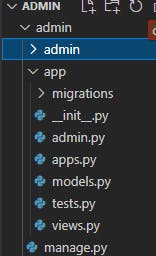
A Django project is a well-structured folder that needs only a few adjustments.
Opening our folder with Vs Code, our project should have a structure like an image below:

Step 4: Create a Django app
The next thing we need to do is to create an app which will house our views, URLs, and models. To do this we need to run the code below:
python manage.py startapp app
The code above will create a Django app named app.
The app we created won't function because we have not yet added it to installed apps in settings.py.
Navigate into settings.py and add app to installed apps
INSTALLED_APPS = [
    'django.contrib.admin',
    'django.contrib.auth',
    'django.contrib.contenttypes',
    'django.contrib.sessions',
    'django.contrib.messages',
    'django.contrib.staticfiles',
    'app'
]
Configuring our Django app
There is a need to configure the Django app so that it can read templates, accepts requests and also use URLs. To do this we need to adjust a few things as shown below:
Step 5: Setting up Templates
Navigate into settings.py, set the templates DIR parameter to 'templates'
TEMPLATES = [
    {
        'BACKEND': 'django.template.backends.django.DjangoTemplates',
        'DIRS': ['templates'],
        'APP_DIRS': True,
        'OPTIONS': {
            'context_processors': [
                'django.template.context_processors.debug',
                'django.template.context_processors.request',
                'django.contrib.auth.context_processors.auth',
                'django.contrib.messages.context_processors.messages',
            ],
        },
    },
]
Now, our Django app will read any folder called templates to search for our HTML files and display them.
We won't be needing an external stylesheet or an image in this article. There won't be a need to set up static settings for Django.
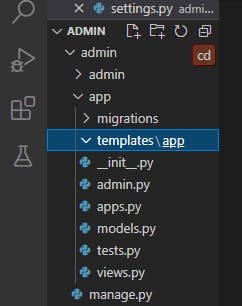
Inside our app folder. Create a folder called templates. Inside this template folder, create another folder called app. Create a login.html file into this new folder. This will tell Django to look inside our created app for templates.
Can we render templates without having URLs? Definitely not. The next step is to configure URLs settings as shown below
Step 6: Set up Urls
We need to configure the URL file in our admin folder. In this folder, we need to configure it so that we can set up URLs in our app folder too.
from django.contrib import admin
from django.urls import path,include

urlpatterns = [
    path('admin/', admin.site.urls),
    path('',include('app.urls'))
]
In the code above, once a visitor reaches the website, Django renders the urls of the app folder.
Step 7: Setting up views
In the app folder, navigate into views.py file, write the code below to render login.html file
def Login(request):
    return render(request,'app/login.html')
Now, create a url.py in our app folder. Inside this file write the code below:
from django.urls import path
from . import views

urlpatterns = [
    path('', views.Login, name="login")
]
With these few settings, our Django app should be functional enough to display something.
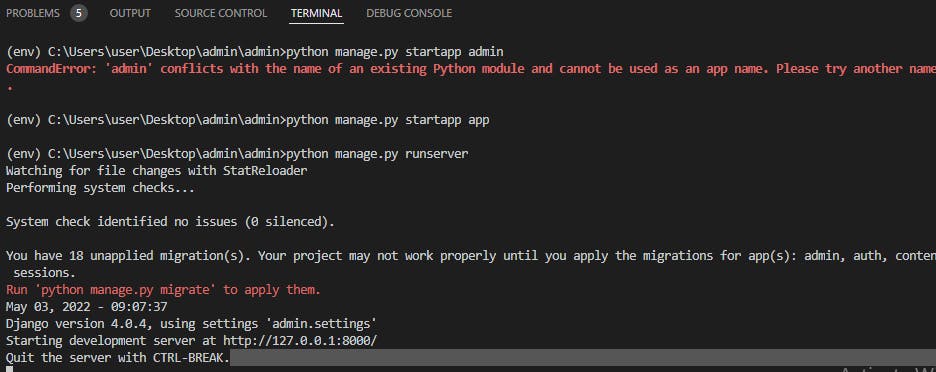
To confirm this let's run python manage.py runserver on our terminal.
If our local server is opened successfully, we should have a screen like this
Open localhost:8000 on a web browser, this should open a white blank page for now since there is nothing written in the index.html file.
Step 8: Add HTML and Styling
Inside our login.html file, we can go ahead and copy the below codes in it.
<!DOCTYPE html>
<html lang="en" >
<head>
  <meta charset="UTF-8">
  <title>Authentication with Django</title>
<style>
    * {
  margin: 0;
  padding: 0;
  box-sizing: border-box;
  -webkit-font-smoothing: antialiased;
}

body {
  background: #e35869;
  font-family: 'Rubik', sans-serif;
}

.login-form {
  background: #fff;
  width: 500px;
  margin: 65px auto;
  display: -webkit-box;
  display: flex;
  -webkit-box-orient: vertical;
  -webkit-box-direction: normal;
          flex-direction: column;
  border-radius: 4px;
  box-shadow: 0 2px 25px rgba(0, 0, 0, 0.2);
}
.login-form h1 {
  padding: 35px 35px 0 35px;
  font-weight: 300;
}
.login-form .content {
  padding: 35px;
  text-align: center;
}
.login-form .input-field {
  padding: 12px 5px;
}
.login-form .input-field input {
  font-size: 16px;
  display: block;
  font-family: 'Rubik', sans-serif;
  width: 100%;
  padding: 10px 1px;
  border: 0;
  border-bottom: 1px solid #747474;
  outline: none;
  -webkit-transition: all .2s;
  transition: all .2s;
}
.login-form .input-field input::-webkit-input-placeholder {
  text-transform: uppercase;
}
.login-form .input-field input::-moz-placeholder {
  text-transform: uppercase;
}
.login-form .input-field input:-ms-input-placeholder {
  text-transform: uppercase;
}
.login-form .input-field input::-ms-input-placeholder {
  text-transform: uppercase;
}
.login-form .input-field input::placeholder {
  text-transform: uppercase;
}
.login-form .input-field input:focus {
  border-color: #222;
}
.login-form a.link {
  text-decoration: none;
  color: #747474;
  letter-spacing: 0.2px;
  text-transform: uppercase;
  display: inline-block;
  margin-top: 20px;
}
.login-form .action {
  display: -webkit-box;
  display: flex;
  -webkit-box-orient: horizontal;
  -webkit-box-direction: normal;
          flex-direction: row;
}
.login-form .action button {
  width: 100%;
  border: none;
  padding: 18px;
  font-family: 'Rubik', sans-serif;
  cursor: pointer;
  text-transform: uppercase;
  background: #e8e9ec;
  color: #777;
  border-bottom-left-radius: 4px;
  border-bottom-right-radius: 0;
  letter-spacing: 0.2px;
  outline: 0;
  -webkit-transition: all .3s;
  transition: all .3s;
}
.login-form .action button:hover {
  background: #d8d8d8;
}
.login-form .action button:nth-child(2) {
  background: #2d3b55;
  color: #fff;
  border-bottom-left-radius: 0;
  border-bottom-right-radius: 4px;
}
.login-form .action button:nth-child(2):hover {
  background: #3c4d6d;
}
</style>

</head>
<body>

<div class="login-form">
  <form>
    <h1>Login</h1>
    <div class="content">
      <div class="input-field">
        <input type="username" placeholder="Username" name="username">
      </div>
      <div class="input-field">
        <input type="password" placeholder="Password" name="password">
      </div>

    </div>
    <div class="action">
      <button>Sign in</button>
    </div>
  </form>
</div>


</body>
</html>
Now, we will need to create users by running migrations to our database. Run python manage.py migrate to do this.
From python shells, run a python manage.py shell command in your terminal. We will create a superuser and a staff user by running the following commands:
#To create staff user

from django.contrib.auth.models import User
>>> user = User.objects.create_user(username = "user1", password ="1234")
>>> user.is_staff = True
>>> user.save()


#To create superuser

from django.contrib.auth.models import User
>>> user = User.objects.create_user(username = "user2", password ="1235")
>>> user.is_staff = True
>>> user.is_superuser = True
>>> user.save()
The above commands will create two users, a superuser that has power over any function and a staff user with limited functions.
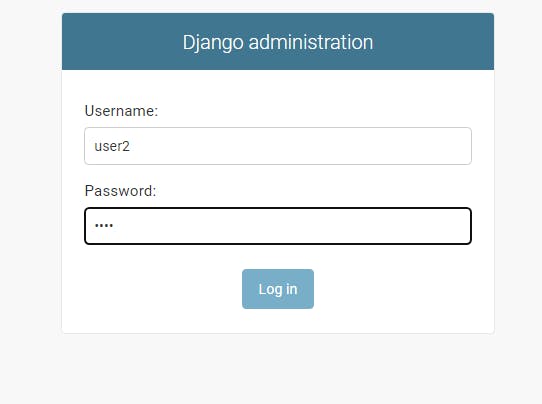
To confirm if our users have been created, let's log in to Django admin using the superuser details, go to localhost:8000/admin and input the username and password of the superuser above into the form fields.
After logging in, we should have two users.
Now, let's show authentication with Django.
Step 9: Authentication
In our index.html page is a login form, we need to make sure that the user is valid, and if it's valid we will redirect them to a page known as dashboard.
To do this, create a dashboard.html in the app templates and render it in views.py
views.py
def Login(request):
    return render(request,'app/login.html')

def Dashboard(request):
    return render(request,'app/dashboard.html')
urls.py
from django.urls import path
from . import views

urlpatterns = [
    path('',views.Login, name="login"),
    path('dashboard',views.Dashboard, name="dashboard")
]
dashboard.html
<!DOCTYPE html>
<html>
    <head>
        <title>Dashboard</title>
    </head>
    <body>
        <h1>Hello welcome to Dashboard</h1>
    </body>
</html>
The next step is to process our login form for authentication. To do this, we create our login function in views.py.
We need to be able to communicate with our backend from the login form, to do this add csrf_token, method and action. The action will contain the name of the URL rendering our Login view.
<div class="login-form">
  <form method="post" action="{% url 'login' %}">
    {% csrf_token %}
    <h1>Login</h1>
    <div class="content">
      <div class="input-field">
        <input type="username" placeholder="Username" name="username">
      </div>
      <div class="input-field">
        <input type="password" placeholder="Password" name="password">
      </div>

    </div>
    <div class="action">
      <button type="submit">Sign in</button>
    </div>
  </form>
</div>
We need to get our form values via POST request and authenticate them using some built-in functions. To do this we run the code below:
views.py
from django.shortcuts import render,redirect

from django.contrib.auth import login, authenticate

# Create your views here.

def Login(request):
    if request.method == "POST":
        username = request.POST["username"]
        password = request.POST["password"]

        user = authenticate(request, username = username , password = password)

        if user is not None:
            login(request,user)
            return redirect('dashboard')
    return render(request,'app/login.html')
After we save this, then we open localhost:8000, we should have a screen similar to the below:
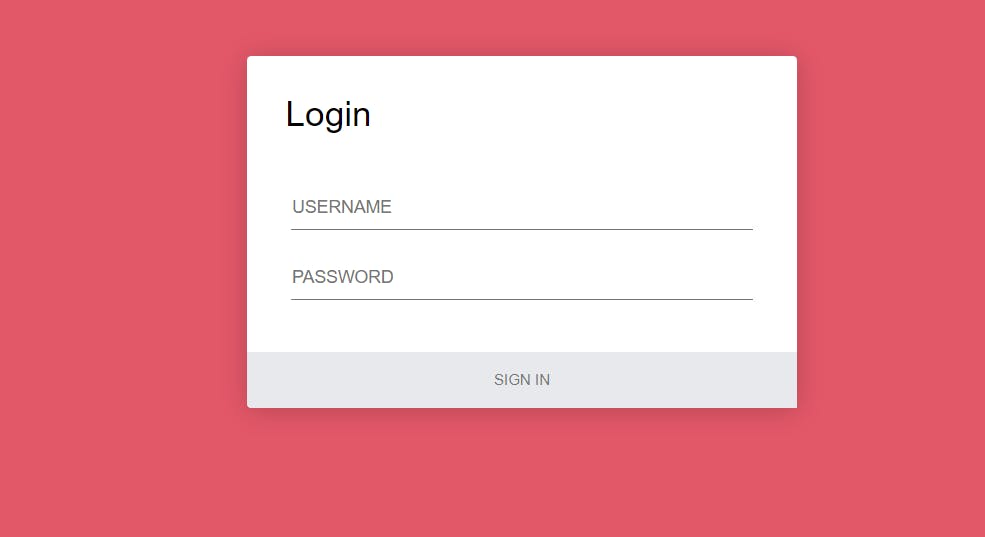
Input the details of any of the users earlier created, we should be re-directed to the dashboard.html file.
With this, we have successfully shown authentication.
We have shown that a user was authenticated and confirmed to be an original owner using the means of a password.
Step 10: Authorization
What about authorization? Let's consider the two users we created, one a superuser and the other a staff user.
Let's show authorization by allowing only the superuser to see a profile name after login. i.e once they log in to dashboard.html, only the superuser will see a pre-set name.
In our dashboard.html, append the following code:
<!DOCTYPE html>
<html>
    <head>
        <title>Dashboard</title>
    </head>
    <body>
        <h1>Hello welcome to Dashboard</h1>
        {% if request.user.is_superuser %}


        <h6>Akinwumi Iyanuoluwa Ayomiposi</h6>

        {% endif %}
    </body>
</html>
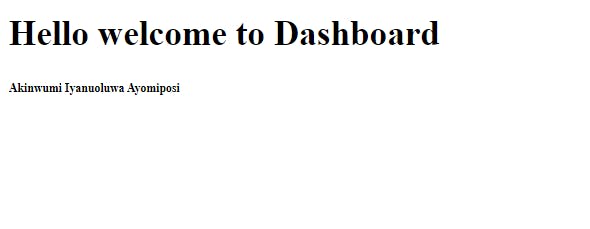
When a superuser like user2 we created logs in, the name in the <h6> tag will get displayed. If not, the name won't get displayed.
When we login with user1 details:
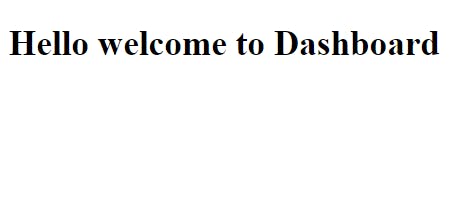
At this point, we have just demonstrated authorization.
After authentication, we were able to direct our program to give special permission to the superuser so that he can access a certain <h6> tag but we did not allow a staff user.
Now, what about an anonymous user who is not authenticated? We can restrict their access to some features.
For instance, we may decide not to show an anonymous user the dashboard by doing the following in our views:
def Dashboard(request):
    if request.user.is_authenticated:
        return render(request,'app/dashboard.html')
    else:
        return redirect('login')
With this code, won't be a to view the dashboard. Instead, there will be a redirect to the login page.
Conclusion
At this point, we have displayed authentication and authorization with Django. Stay tuned for more interesting posts.
To see or clone or add to the set of codes, visit my Github repo django-auth